
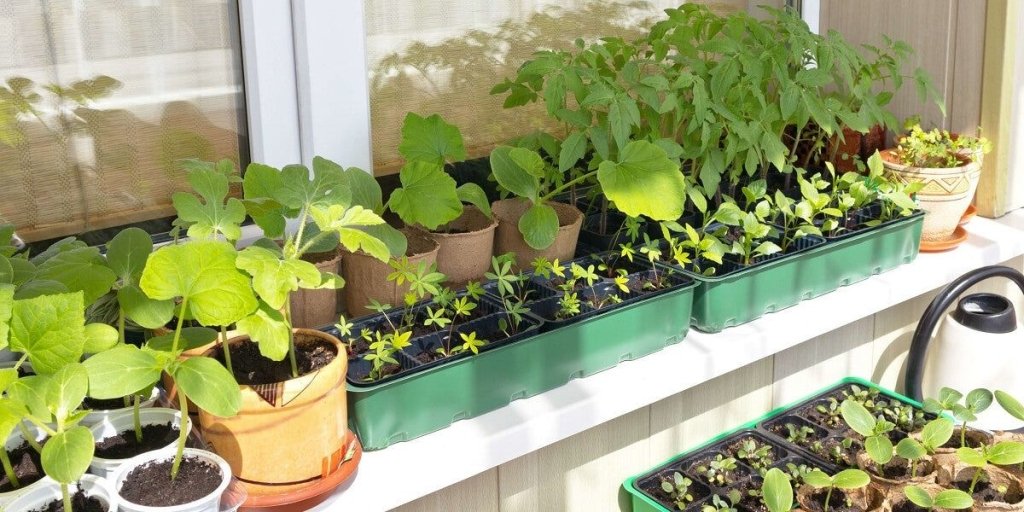
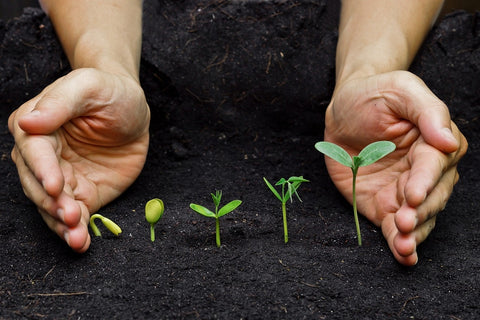
So you've decided to start a garden. You've done your research, ordered the best soil, ordered seeds, packets arrived, planted them directly or kept them at the north-facing window. But wait, nothing's happening. They aren't germinating, and you don't know why didn't your seeds germinate. Don't worry; you're not alone!
Every spring, experienced and inexperienced gardeners face the issue of seed germination. We've discovered a lot of similarities in why our customers have been having difficulties with seed germination over the years. The primary challenges inhibiting seed germination are soil sterility, temperature, moisture levels, patience, lack of knowledge or experience and sowing outside of season.
We're hoping you have great success starting vegetable, flower, and herb seeds and that your gardening activities flourish. So, we wrote this guide to help gardeners learn where you might go wrong and how to take actionable steps toward remedying the issue. After all, In your success lies our own!
When the germination rate is poor, it's essential to take a step back and figure out what went wrong. So without further ado, let's deep dive into the most common reasons seeds won't germinate and what you can do about it to fix it.
1. Incorrect Soil Temperature Causes Seed Germination Failure
Most seed packets do have sowing instructions which include the best time of year to plant & optimal soil temperature for germinating seeds, among other types of information. This temperature number is based on years of research and gives gardeners the best chance for success. If you don't see seeds sprout within a few weeks, it may be due to non-ideal soil temperature.
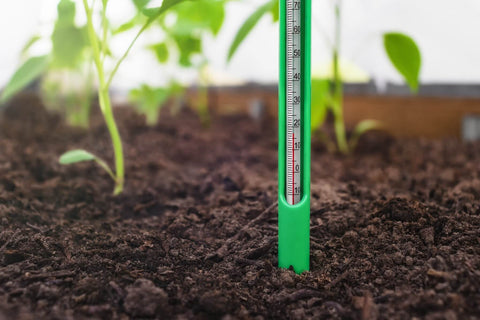
Temperature is Crucial for Germination.
Seeds are living organisms, and like all living things, they have Optimal Temperature Ranges (OTRs) in which they thrive. Unfortunately, OTRs can vary significantly from one species of plant to another. For example, tomato seeds have an OTR of 21-28°C, while spinach seeds have an OTR of 10-21°C. If you're trying to germinate tomato seeds at 15°C, you will likely have some trouble. We are talking about the soil temperature, not the air temperature above the seed tray or garden row.
For seeds to germinate successfully, they must be within their correct OTR for an extended period. If the temperature is too high or too low, the germination process will either slow down or come to a complete halt. Excessive heat or cold will kill them. In some cases, it's possible to revive them subjected to incorrect temperatures by moving them into their proper OTR; however, this isn't always possible.
Tips for Maintaining Correct Temperature
1. Use a Germination Thermostat:
A thermostat designed for seed germination is one of the most accurate ways to ensure your seeds are kept at the correct temperature. These thermostats typically allow you to set the desired temperature and will automatically turn heaters or cooling fans on or off as needed to maintain that temperature. Temperatures that are too high or too low can cause problems germinating seeds.
2. Use of a Heating Pad or Seedling Heat Mat:
Heating pads or heating mats are designed to aid germination during the cooler time of the year and can be placed under your planting tray or pot to provide gentle, even heat. Just be sure not to set the heating pad to its highest, as this could overheat your new seeds. More information is found here.
3. Use a Mini Greenhouse:
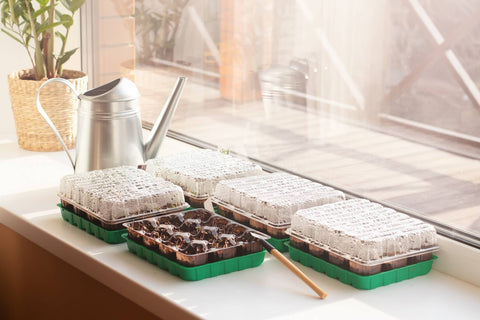
An easy way to maintain consistent temperatures is using a mini greenhouse and placing the seed trays inside. This is also one of the best ways of seed starting indoors, protecting them from extreme temperatures. If you're starting seeds indoors, you can adjust the light & temperature as needed using grow lights and heating mats.
2. Wrong Planting Depth Contrary to The Seed Packet Sowing Instructions
Seeds need light to germinate, and if they're buried too deep, they may never see the light of day—literally. If you plant your seeds too shallow, they will dry out quickly and won't be able to develop correctly.
Why Seed Depth Matters
The process by which they sprout is called photosynthesis, and it's how they convert sunlight into the energy they need to grow. If your seeds are buried too deeply, they won't be able to photosynthesize, and they'll never sprout.
In addition, a seed packets contains instructions on how deep to plant the seeds. These instructions are there for a reason—if you don't plant the seeds at the correct depth, they probably won't germinate. So, if your seeds have the best chance of success, plant them at the correct depth.
How to Plant Your Seeds Correctly
The best way to ensure that your seeds are planted at the correct depth is to use a seed-starting mix specially formulated for seedlings and contains everything young plants need to thrive. It is also sterile, which means they're free of harmful bacteria and fungi that could kill your young plants.
First, fill your planting tray with a seed-starting mix to plant your seeds correctly. Then, use a pencil or your finger to make small indentations in the mix—these indentations should be about twice as deep as the width of the seeds. Drop one seed or a few seeds (if tiny) into each indentation, then lightly cover the seeds with more mix. Water gently until the mix is evenly moistened, being careful not to wash the seeds out of their indentations. If you've ever planted a tray of seeds only to have them all fail to sprout, chances are you made the common mistake of planting them too deeply or too shallow.
3. Lack Of Water
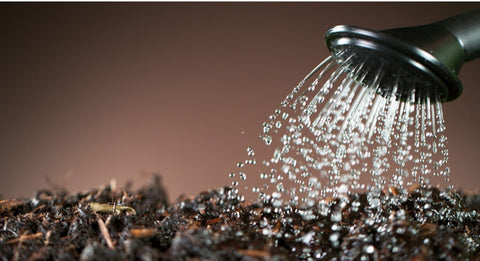
Seeds are dormancy stage plants & water is essential for proper seed germination. They need water to break out of dormancy and begin growing. Water helps to start the process of cell expansion within the seed, which eventually leads to sprouting. Seeds that don't receive enough water will be unable to break out of dormancy and ultimately die.
While trying to germinate seeds, the key to success is to keep the soil moist, not too dry or wet. Keep the growing medium evenly moist by monitoring it often. If you're having trouble with over or underwatering your seedlings, consider misting the soil instead of pouring water in. It can be difficult to control how much water your plants are getting when you pour it directly into their pots or trays, but using a spray bottle will help make sure they get just enough.
4. Too Much Water
If you're new to gardening, you might be tempted to play it safe and water your seeds twice a day. After all, it's better to err on the side of caution, right? Wrong! When it comes to watering seeds, more is not necessarily better.
The Dangers of Over-Watering Your Seeds
When seeds are first planted, they need moisture to germinate. However, once they've sprouted and begun to grow, too much moisture can be detrimental to their development. Plants need oxygen to grow, and if their roots are constantly submerged in water, they won't be able to get the oxygen they need. This can cause them to rot and die before they even have a chance to mature. Additionally, over-watering can leach nutrients out of the soil and make them unavailable to the plant. This can stunt growth or even kill the plant outright.
So, how much water do your seeds need? It depends on several factors, including the seed type, the garden's temperature and humidity, and the type of soil you're using. However, as a general rule of thumb, you should water at least once a day until they sprout, then reduce watering to once every other day or as needed - the water should soak down below the level of seeds, not sit on the soil surface. Check the soil frequently; if it feels dry several centimetres below the surface, it's time to water again.
5. Poor Drainage
Have you ever had the problem of your seed mix not draining? If so, you know how frustrating it can be to figure out what is causing the problem. Is it the soil mix itself? Or is it something else?
There are a few things that can cause poor soil mix drainage. One of the most common problems is using too much organic material in the mix. Organic matter, such as coco coir or compost, can absorb water and hold onto it for a long time. This can cause the soil mix to stay wet for too long, leading to rot or soil borne fungi growth problems.
Another problem that can cause poor drainage is using too much clay. Clay particles are tiny and tend to bind together when wet. This can make it difficult for water to move through the mix and cause seed germination problems.
The last thing that can cause poor drainage is insufficient perlite or sand in the mix. These materials help to improve drainage by creating tiny pockets of air in the soil mix. This allows water to move freely through the mix and helps prevent rot or fungal growth problems.
6. Not Enough or Too Much Light
Seeds need light to germinate. This is because the process of germination stimulates the embryo's growth inside the seed. Once the embryo starts growing, it needs light to continue developing.
While seeds need light to germinate, too much light can also be a problem. They will become dried out and die if exposed to too much light. This is why it's essential to plant your seeds at the proper depth. When starting seeds indoors, placing them under lights allows more regulated growth. The moral of the story is that when it comes to seed germination, there can be such a thing as too much or too little light.
For seeds that require direct sunlight, scatter them on the surface of the potting mix and lightly press down. Some other kinds of seeds need darkness to germinate, so for them, sow 3-5mm below the surface of the potting mix. Put black plastic or newspaper over the container until they sprout.
So if your seeds aren't germinating, try moving your planting tray to a different location and see if that does the trick! It's also worth noting that some seeds require darkness to germinate.
7. Too Much Fertiliser
Fertiliser is essential for healthy plant growth. However, it is possible to apply too much fertiliser, which can have a negative impact when you plant seeds. When seeds are exposed to high nitrogen levels, they may absorb too much moisture and become waterlogged. This can lead to seed death or the development of fungal diseases.

In addition, high nitrogen levels in the soil can inhibit the uptake of other essential nutrients, such as phosphorus and potassium. As a result, your seeds may not receive the vital nutrients they need to germinate and grow into healthy plants. Use the right amount of fertiliser for your particular gardening needs. Avoid over-fertilising by evenly distributing it across your planting area and avoiding applying more than the recommended amount.
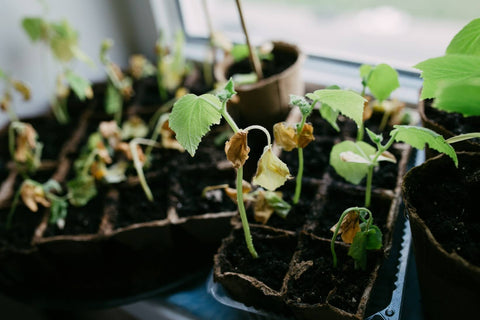
8. Pests or Diseases
Insects, rodents, and other animals can all wreak havoc on a garden, destroying plants and seeds. The best way to prevent pests from ruining your garden is to take preemptive measures, such as traps, sprays, or other control methods specific to the type of pest you're dealing with.
Bugs and other pests won't necessarily kill your seeds, but they can feast on tender seedlings before they've had a fair chance to emerge, making it seem like your seeds failed to germinate.
Plant pathogens can cause problems in your garden, making it difficult for them to grow and thrive. The best way to prevent diseases from ruining your garden is to take preventive measures, such as soil sterilisation and crop rotation. To prevent this disease, ensure you are only using sterile soil and that all your containers are clean before you use them.
9. Soil Compaction
Soil compaction can be a real issue for gardeners, especially beginner gardeners who may not be familiar with the problem. It is caused by the pressure of heavy objects on the ground. This pressure can be caused by people walking on wet soil, construction equipment, or even heavy rain.
When the soil is compacted, it becomes dense and hard, which makes it difficult for air and water to reach the roots of plants. This lack of oxygen and water can prevent seed germination and cause existing plants to wilt and die.
You can do a few things to prevent soil compaction in your garden. First, make sure that you till your soil before planting. This will loosen up the soil and make it easier for roots to penetrate. Secondly, avoid walking on wet soil as much as possible. If you must walk on wet soil, try to spread your weight by walking barefoot or strolling instead of stomping.
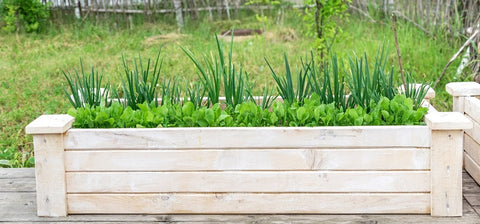
Finally, consider using raised beds for your garden. Raised beds help to prevent compaction because they provide a dry area for planting that won't be as easily compacted as lower areas.
10. Lack of Oxygen
Have you ever wondered why seeds need oxygen to germinate? After all, they're hidden away in the ground, so it's not like they're getting any fresh air down there.
To understand why seeds need oxygen to germinate, it's helpful to have a basic understanding of the germination process. It involves using stored energy within the seed to break down its food reserves and begin growing new tissue. This process can be divided into four distinct steps:
1) moisture uptake;
2) radicle emergence;
3) plumule emergence; and
4) cotyledon expansion.
Of these steps, radicle emergence—the point at which the seedling's first root begins to grow—is the most crucial. For radicle emergence (and, by extension, germination as a whole) to occur, seeds must take in oxygen. If they don't, the process simply won't happen.
The Importance of Oxidative Respiration
So why does oxygen play such an essential role in radicle emergence? The answer has to do with something called oxidative respiration. Oxidative respiration is a metabolic process that releases energy by breaking down glucose molecules in the presence of oxygen. This process is essential for seedling growth because it provides the seed with the energy it needs to start growing new tissues and developing into a plant. Without oxygen, oxidative respiration cannot occur, and seedlings will be unable to access the energy they need to grow. As a result, they will either fail to germinate or produce stunted and unhealthy plants.
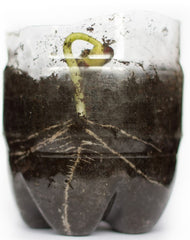
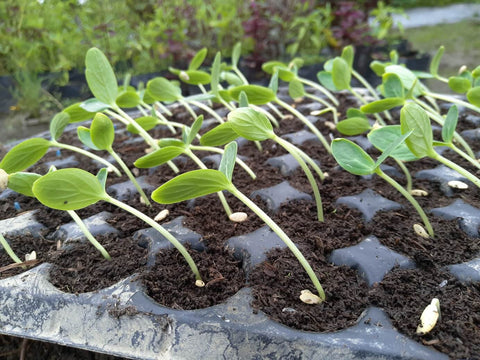
One way to ensure your seeds get enough oxygen is to start them in a seedling tray with drainage holes. Seedling trays are shallow containers with compartments (often called "cells") used to start seeds indoors before they are transplanted outside. The holes in the bottom of the tray allow excess water to drain away from the seedlings' roots and provide much-needed aeration.
So next time you plant your garden, give your seeds plenty of fresh air! They'll thank you for it later.
11. Seed Dormancy
Seed dormancy is a naturally occurring phenomenon that prevents seeds from germinating until certain environmental conditions are met, even if all other conditions, such as light, water, and warmth, are met. For example, some seeds require a period of cold stratification (a process of exposing seeds to cold temperatures for a period of time) before they will germinate. Other seeds must be scarified (nicked or scratched) before sprouting.
Dormancy prevents seeds from germinating too early in the season when conditions might not be ideal for their growth. Once dormancy is broken, and the conditions are right, the seed will resume its normal growth cycle.
What Causes Seed Dormancy?
Several factors can cause seed dormancy, including:
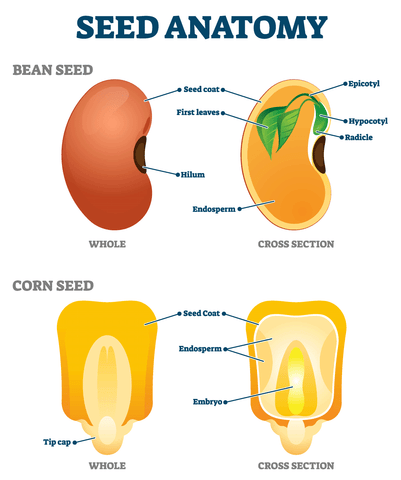
-Inner Coatings: Many seeds have an outer coating that helps protect them from damage and dehydration. Underneath that coating is a thinner layer called the endosperm. The endosperm typically contains food reserves that the plant embryo will use for energy as it sprouts and grows. In some cases, the endosperm can also prevent moisture and oxygen from reaching the embryo, causing dormancy.
-Chemical Reactions: Some chemical reactions must occur for a seed to sprout. For example, one common type of reaction is called gelation. During gelation, water molecules mix with other molecules in the seed to form a jelly-like substance called mucilage. Mucilage helps support cell growth as the embryo begins to sprout roots and leaves. However, if gelation doesn't occur or isn't completed correctly, the seed may become dormant.
-Low Temperature: In some cases, low temperature can cause dormancy by disrupting chemical reactions or slowing down cellular activity inside the seed. Once temperatures rise again, these reactions and processes will resume, and the seed will begin to grow.
-Lack of Oxygen: Just like people, plants need oxygen for their cells to function correctly. If a seed doesn't have enough oxygen available during its development phase, it may enter dormancy until conditions improve.
How Can I Break the Dormancy?
If your seeds are dormant, you first need to figure out what type of dormancy they have and then take the necessary steps to break dormancy. Once you've done that, your seeds should start germinating within a few days.
The most common way to break seed dormancy is by subjecting them to what's called stratification. Stratification imitates winter conditions by exposing seeds to cool temperatures and moist soils for a period of time—usually between 30 and 90 days—before planting them outdoors in springtime. This process breaks down any protective coatings around the seeds so they can absorb water more efficiently. It encourages chemical reactions like gelation to take place so the seeds can begin growing roots and leaves once planted.
12. Poor Seed Quality
When it comes to gardening, one of the most critical elements is seed quality. If you plant poor-quality seeds, it's unlikely to germinate properly or produce a healthy plant. Not only will you be disappointed with your results, but you'll also have wasted time and money on seeds that were never going to work in the first place.
Another reason why poor seed quality is a problem is that it can make gardening more difficult. If you constantly have to replant seeds that don't germinate properly, it takes away from the enjoyment of gardening and can make it feel like more of a chore than a hobby.
So How Can You Avoid Poor Seed Quality?
The best way to avoid poor seed quality is to buy your seeds from a reputable source. Many reputed seed companies in Australia, including Happy Valley Seeds, sell high-quality seeds that are guaranteed to germinate and produce healthy plants. Do the research and find a company you trust before buying your seeds. Additionally, read the reviews on any seed you're considering purchasing to know what others have experienced with that particular type of seed.
13. Old Seed Packets
Why haven't my saved seeds germinated? Some experienced gardeners are successful in planting seeds that are ten years or more, but usually, they have a storage life, particularly if they've been subjected to fluctuations in temperature. Don't expect a high germination rate for old seeds in general, but you may get a pleasant surprise if they are stored well!
The first reason old seeds may fail to germinate is that they may no longer be viable. A viable seed needs to have the ability to sprout and grow into a plant. As seeds age, they lose moisture and begin to deteriorate. This deterioration process can make it difficult for the seed to absorb water, which is necessary for germination. Additionally, the enzymes inside the seed responsible for germination may also break down over time, making it impossible for the seed to sprout.
Seeds May Have Been Stored Incorrectly
Another reason old seeds may fail to germinate is that they may have been stored incorrectly. Seeds must be stored in a cool, dry place to stay viable. If they are stored in a warm or humid environment, this can speed up the deterioration process and make it more difficult for the seed to germinate.
How Can You Test Seed Viability?
There are a few ways that you can test whether your seeds are still viable. One method is to simply sow the seeds in a moist potting mix or paper towel and then place them in a warm location. Check on the seeds daily; if they've swollen and formed little tails, they're probably still good. When the average germination time for that seed is up, unwrap the towel and count the number of seeds that have sprouted and divide by the total number of seeds placed in the towel. This will tell you the germination rate for this group of seeds. Another method is to float the seeds in a cup of water; viable seeds will sink while non-viable ones will float.
14. Insufficient Scarification
Many seeds need to be scarified before they will germinate. Scarification is a process of nicking or scratching the hard seed coat to allow water to enter the seed. Most often, this needs to be done with harder seeds like the winged bean, bitter melon, nasturtium or moonflower. If you don’t scarify your seeds, germination may still occur, but it will take much longer or may not happen at all.
Types of Scarification
There are a few ways that you can scarify your seeds, including filing, sanding, nicking with a sharp knife, or soaking in sulfuric acid (this should only be done if you are experienced).
If you choose to file your seeds, you will need a piece of sandpaper or a nail file.
If using sandpaper, hold the seed firmly in one hand and lightly rub the seed back and forth over the sandpaper until you have removed enough of the coat to allow water to enter.
If using a nail file, insert the end of the file into the side of the seed and twist until you have produced a nick in the coat. Doing this also works well for larger seeds.
Sanding is much like filing, except that you will use sand instead of sandpaper or a file. The best type of sand to use is horticultural sand but play sand from the hardware store will also work in a pinch. Fill a bowl with sand and add water until it is the consistency of wet beach sand. Add your seeds and stir them for 30 seconds to 1 minute, making sure all sides of each seed are exposed to the abrasive sand. Drain off any excess water and sow your seeds as usual.
The quickest but possibly most dangerous method is nicking with a sharp knife. Place your seed on a cutting board, and using a very sharp knife, make 1-2 shallow cuts into the side of each seed. You want to make sure that you do not cut too deeply, or you may damage the embryo inside the seed, which will prevent germination from occurring at all.
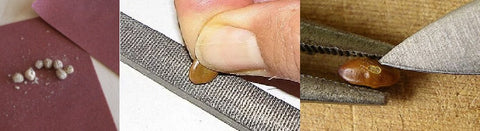
If you are unsure how much scarification your seeds need, a good rule of thumb is to start with light scarification and increase the level of aggressiveness if necessary. You can always scarify your seeds more, but you cannot un-scarify them once you have started.
Once you have chosen your method, it is time to sow your seeds. Make sure that you plant them immediately after scarifying.
15. Plant Seeds Without Correct Stratification Process
If you're a beginner gardener, you may have heard the term "stratification" but aren't quite sure what it means. Stratification is the process of cold-treating seeds to mimic the conditions they would experience in nature. By replicating these conditions in a controlled environment, we can break the seed dormancy period and encourage germination.
Different types of seeds require different stratification times and methods. For example, some seeds need to be cold-treated for several weeks, while others only need a few days. It's essential to read the seed packet sowing instructions & do your research before stratifying your seeds to ensure they are receiving the correct treatment.
How Incorrect Stratification Can Be Harmful
If you stratify your seeds incorrectly, it can cause germination failure. For example, exposing your seeds to too much cold for too long may experience frost damage. In some cases, incorrect stratification can delay germination or prevent it altogether. This is why it's important to do your research and follow the directions carefully when stratifying your seeds.
16. You Didn't Use New Or Sterilised Containers
Many beginners make the mistake of not using new or sterilised containers or seed trays when starting their garden. This is a BIG no-no and can fail seed germination.
Using new or sterilized containers to plant seeds is crucial because it will help ensure they are free from diseases and pests. If you reuse old containers, there is a chance that disease-causing bacteria and fungi can be transferred to your seeds or young seedlings. This can result in your plants becoming sick and possibly dying. Not to mention, insects can also hitch a ride on old containers and infest your seeds.
One simple way to sterilise containers is to soak them in a bleach solution and water for at least 30 minutes. Another way is to wash them in hot, soapy water. After soaking, be sure to rinse the containers thoroughly with clean water.
17. Lack of Knowledge & Experience
Seed germination is a complex biological process that requires the right mix of temperature, moisture, and oxygen. If any of these elements are out of balance, it can prevent your seeds from sprouting; hence, it's vital to research before planting if you are a rookie gardener. Make sure you know the optimal conditions for germination for the type of seeds you're planting. Once you've done that, it's just a matter of ensuring you create an environment that meets those conditions.
The second reason seed germination may be failing is that you lack experience. Even if you create the perfect conditions for germination, there's always a chance that your seeds will fail to sprout. It's important to remember that seed germination is a natural process that is dependent on your local climatic conditions.
18. Improper Storage
Many gardeners save seeds from one year to the next to grow their favourite plants again or share them with friends. If you have saved seeds from your garden, it is essential to store them properly to ensure that they will be viable the following season. Seeds should be stored in a seed packet or similar container in a cool, dark, dry place. Seed viability is reduced by exposure to light, heat, and moisture, so it is vital to keep them away from sources of heat and humidity. With proper care, your seed stash will be ready to plant when the spring arrives.
Seeds are living organisms that need specific conditions to remain viable for storage. The most crucial factor is to keep them dry, as moisture is the number one killer of seeds. To do this, you'll need an airtight storage container, such as a glass mason jar with a tight-fitting lid. You can also put a silica gel pillow in the bottom of the jar to help absorb any moisture that does build up. It's also important to keep your seeds cool and out of direct sunlight, which is why storing them in the refrigerator is ideal. Just be sure to let the seed packets come to room temperature for 6-8 hours before opening it, as sudden changes in temperature can damage the seeds. With proper care, your seeds can remain viable for 2-4 years or longer.
19. Too Impatient or Over Excitement to Plant Seeds
In Australia, gardeners have to be very careful about timing when starting a new garden, especially if they're planting seeds. If germination conditions aren't optimal for the region where you start them, the chances of survival are slim. Although some might manage to hold on and sprout much later, it's not worth the risk. It's better to wait until conditions are perfect so that you can get the best results possible.
Down under, the planting season runs from spring to autumn, so you'll need to consider your climate zone when choosing when to start your seeds. You may need to wait in cooler areas until late spring or even early summer. And in tropical areas, you may be able to start seeds all year round. No matter what your climate zone, it’s always best to check with your local gardening centre.
Waiting for the perfect time to plant may seem like a pain, but trust us, it's worth it! By following these simple guidelines, you'll be sure to have a bountiful garden in no time.
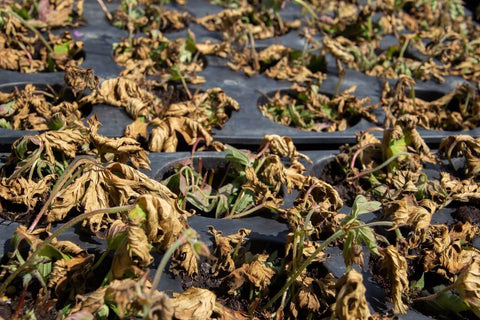
20. Damping Off Disease
If you're new to gardening, you might not know about something called "damping off disease." A fungus causes damping off disease, and it can affect your young seedlings just as they're starting to grow. Pre-emergence damping-off kills seed or seedling sprouts before they emerge. This form of damping-off is triggered by a range of fungi, including Pythium spp., Rhizoctonia solani, and Fusarium spp. These fungi commonly enter the seed via openings in the seed coat or damaged coats. The fungus grows inside the seed, causing it to rot. The seeds will not germinate or produce weak, disease-prone saplings.
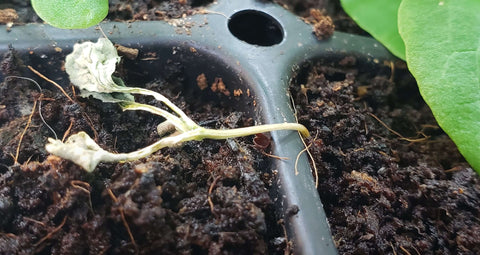
Damping off disease can be a real pain for gardeners, but fortunately, there are some easy things you can do to prevent it. By using a sterile potting mix, watering early in the day, and keeping your garden tools clean, you can avoid damping off disease and enjoy a healthy garden all season long!
21. Still No Green Thumb? Here’s Why
The variety of shapes, sizes, and qualities that seeds may have is precisely how Mother Nature intended them to be. Some seeds naturally have higher, some have lower, or some have erratic germination rates and may take up to a few months (native & certain species of medicinal herb seeds) to sprout to test your patience!
The common problem is that not every seed will sprout into a plant; this can be due to uneven watering or older seeds that have travelled through too much environmental stress over time (such as heat). With all seeds, no matter where you purchase them, it's common for a certain portion to fail. Your packet of seeds might say it has 100 beetroot seeds, but that doesn't mean all of them will grow into 100 plants.
Don't give up! Even with ideal conditions, some seeds just won't germinate no matter what you do. The key is to be patient and persistent – eventually, you should see results!
Happy Valley Seeds is an Australian family-owned and operated business supplying fresh, high-quality vegetable seeds, flower seeds & herb seeds to Australian gardeners since 2012. We only sell seeds that have high germination rates so that our customers will be happy with their purchase. We are dedicated to providing the best possible customer experience and stand behind our products 100%.
12 comments
Jose
I live in Thailand and last year I had a good crop of lettuces but this year is not as good sparsley germination and stunted seedlings, after reading your article about seed germination I realized that the temperature this year is well above last year’s
and I assume this is the main reason why I had a poor seedling germination. Thank you for the useful information.
Frank Njeru
An excellent eye opener for a serious gardener
Angela Clayton
all of my seed packs arrived. I was ready to head out and start planting, used soil, used containers, unknown temperature.
Thank goodness I just read this or I would have lost the lot.
Off to the shops I go, list in hand
Trina
I was so perplexed before reading about the "21 Reasons ". Thanks!
I better understand now and learned why I experienced certain things. Very informative. 🙂
Richard
I had a big smile on my face when I read ‘21 reasons’.
We sell seeds on line and the odd person leaves Negative Feedback due to that reason and its b…..y annoying when 100 other gardeners have no problem with germination.Can I have permission to quote your name and advice to him? Thanks
Marco
Excellent article.
Alot of information.
Thank you
Betty
I love planting from seed. Exciting to watch seeds emerge from the ground.
It is wonderful just how a small seed can grow into a plant. Nature is sure wonderful.
Mary
Great information for a ‘born again’ gardener. I haven’t grown from seed for a long time; now retired I’m looking forward to the challenge of pot/raised bed gardening.
Ross
Very informative, picked up a few tips.
Thanks very much.
Deborah
Thanks for such an informative & comprehensive overview on seed germination – lots of great tips in there! Happy growing 🌸🌼🌺
Elaine
I appreciate that you remained non-partisan in your comments on seed quality. I believe that shows high ethical standards.
Lilian
This was a very useful article, thank you ☺️👍