
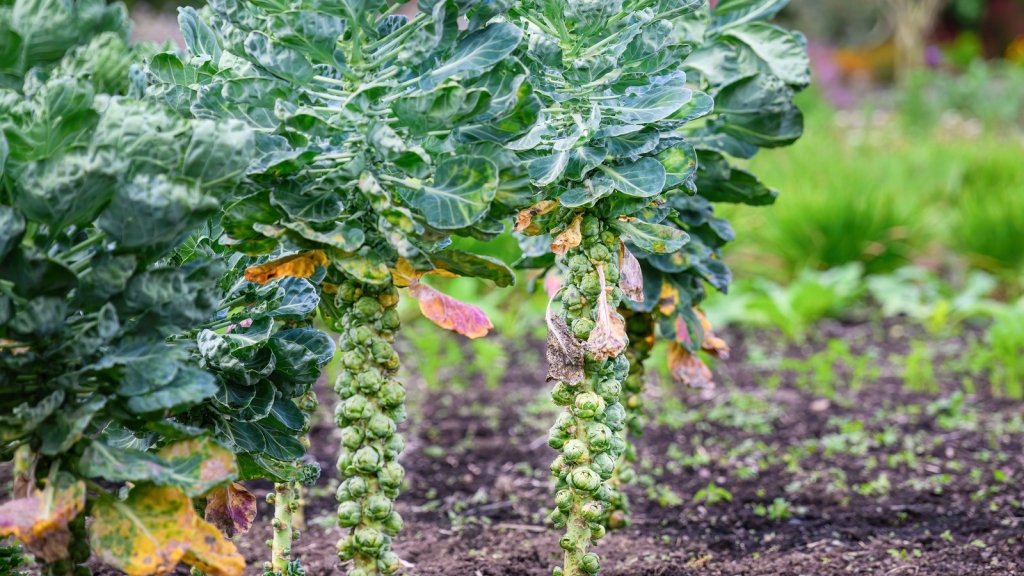

The short version: Brussels sprouts need a long, unbroken season and a genuinely cool finish, so in most of Australia the seed goes in during late spring or early summer, not in autumn with the rest of the brassicas. They do best in the cool and alpine zone and in the colder parts of the temperate and Mediterranean zones. They are marginal in the subtropics, doubtful across most of the arid zone, and not worth the bed space in the wet tropics. A well grown plant can carry 50 or more sprouts, but it holds its patch of ground for six to nine months to do it.
Brussels sprouts are one of the crops Australian gardeners most often get wrong, and the failure looks the same every time: a tall stem hung with loose, leafy rosettes instead of tight little buttons. That is rarely bad luck. It is almost always a sowing date.
Why Brussels sprouts go wrong
A Western Australian Department of Agriculture farmnote from 2000 on growing Brussels sprouts puts the growing period at six to nine months and calls the plants slower growing than the other brassicas. Cabbage can be in and out in a season. Sprouts cannot.
Temperature then does its work in two stages. The same farmnote states that sprouts "require a warm climate to develop a good plant frame and low temperatures to produce high quality sprouts", and that "the plants must grow uninterrupted with no check in growth". Warmth builds the tall leafy frame, cold packs the buttons tight, and a stall in between costs you either way.
Each sprout is an axillary bud, a shoot sitting where a leaf meets the stem, as the University of New Hampshire explains in its Brussels sprouts topping study. Buds that swell in warm weather keep growing outward instead of closing, which is why the Australian planting guide Gardenate warns that sprouts in warm districts open and go floppy. Growers call the worst of them blown.
So the sowing date decides the crop. ABC Gardening Australia magazine says it plainly in its guide to planting brussels sprouts: plant in early summer, before the end of December, so the plants are well established by the time the cool weather arrives.
Where they work in Australia, and where they do not
- Tropical (Darwin and the Top End of the Northern Territory, Cairns and Townsville in far north Queensland, Broome and the Kimberley in Western Australia, and Cape York): not worth the bed space on the coast or in the lowlands. Gardenate lists sprouts as not recommended for Australian tropical regions, and although the ABC Gardening Australia calendar allows a February to April sowing, lowland dry season nights rarely fall low enough to firm a button. The exception is elevated country such as the Atherton Tablelands in Queensland, where dry season nights are genuinely cool: there, follow the subtropical advice below. Everywhere else in the tropics, grow cabbage, kale or Asian greens instead, starting with our guide to growing cabbage from seed.
- Subtropical (Brisbane, the Gold and Sunshine Coasts and Bundaberg in south east Queensland, and Coffs Harbour, Lismore and the rest of the New South Wales north coast): marginal, and the sources disagree. ABC Gardening Australia magazine gives a February to June sowing, while Gardenate does not recommend the crop here at all. If you try, sow as early in autumn as you can, use your coolest open bed, and expect some loose sprouts. Cooler highland gardens such as those around Toowoomba do better than the coast.
- Arid and semi-arid (Alice Springs in the Northern Territory, Kalgoorlie in Western Australia, Broken Hill in New South Wales, Mildura in north west Victoria, Port Augusta in South Australia and most of the inland): possible in southern districts that get genuine frost, doubtful further north. Both Gardenate and the ABC Gardening Australia calendar put sowing in January to February and planting out in February to March, which means raising seedlings in the worst of the heat, under shade. Where winter nights do not drop away, spend the bed on cabbage instead.
- Temperate (Sydney, Newcastle and Wollongong in New South Wales, Melbourne and Geelong in Victoria, and most of the coastal south east): the mainstream window, and both Gardenate and the ABC calendar agree on it. Sow December to January and plant out January to February. Mild coastal gardens give a later, softer crop than gardens further inland.
- Mediterranean (Perth, the south west of Western Australia, Adelaide and the South Australian gulf country): a real option with local timing. A Western Australian farmnote from 2000 has commercial growers transplanting from October to January in the south west, late December to February in the Perth Hills, and January to March in Perth, so raise seedlings from about September in the south west and from November around Perth. For Adelaide and the gulf country, use the temperate window: sow December to January and plant out by February.
- Cool and alpine (Hobart and the Tasmanian highlands, Canberra and the rest of the Australian Capital Territory, Ballarat in Victoria, Katoomba, Orange, Bathurst, Armidale and the New South Wales southern tablelands, and Stanthorpe on the Queensland granite belt): the best zone in the country for this crop. Both calendars agree: sow November to December and plant out December to January, so the frame is up before the cold and the sprouts fill through winter.
These zones are broad groupings. If you garden between two of them, on a range, in a frost pocket or on a warm coastal slope, lean on your own first and last frost dates rather than on the zone label.

Raising seedlings and planting out
Start the seed in punnets, because you will be sowing into summer heat. ABC Gardening Australia magazine suggests 10 mm deep in seed raising mix, kept moist, with germination in seven to 14 days, then potting on into 10 cm pots. Gardenate gives a soil temperature range of 7°C to 30°C and four to six weeks in trays; the farmnote has commercial plants going out at five to seven weeks old. Keep the tray under 30 per cent shadecloth while it is hot, which cools the seedlings and keeps cabbage white butterflies off them at the stage when a few caterpillars can finish a plant.
Plant out at about 8 cm to 15 cm tall, set deeper than the seedlings sat in the pot, with the lowest leaves at soil level. The Royal Horticultural Society recommends that in its Brussels sprouts guide, so plants root in deeply and stand up better later.
Dig compost or well rotted manure through the bed first and check the pH. ABC Gardening Australia magazine says to lime or add dolomite below pH 6, and the RHS suggests raising acidic soil to at least 6.5, because club root is much less active in less acidic ground. Sprouts hold a bed for most of a year, so rotate the whole brassica family together: the farmnote asks for at least three years between brassica crops, and our guide to vegetable plant families shows which crops belong in that group.
Spacing, firm ground and staking
Give each plant 60 cm in every direction. The RHS calls that wide spacing crucial for light and air, and says close planting both reduces the crop and encourages fungal disease. ABC Gardening Australia magazine uses the same 60 cm, and the farmnote notes that wider spacing reduces bacterial and fungal infection on the sprouts. The reason crowding costs you is simple: every sprout forms in the axil of a leaf, so a full stem of buttons depends on a full set of large, well lit leaves.
Firm ground matters just as much. The RHS advises preparing the bed early so it settles, or firming it by treading it down with shuffling steps before planting. A sprout plant can reach 90 cm or more, and a tall stem in loose soil rocks in the wind, which loosens the roots and checks growth at the wrong time. Mound soil around the base in late summer, and stake taller plants with a sturdy cane in exposed gardens. ABC Gardening Australia magazine adds a good habit: take a few of the lowest leaves off each week, which cuts wind resistance and opens up the base of the stem.

Feeding: generous early, gentler late
These are hungry plants. ABC Gardening Australia magazine recommends blood and bone or pelletised poultry manure worked into the bed, more organic fertiliser every six weeks, a seaweed solution or liquid feed fortnightly, regular deep watering and a straw mulch. A plant that goes hungry or dry for a fortnight in February pays for it in June.
Then ease off the nitrogen as the buttons start. The farmnote is blunt about it: do not use too much nitrogen, as this may cause loose, open sprouts. A late nitrogen hit tells the plant to make leaf, and a sprout that has been told to make leaf will not close.
Should you top the plant?
Topping, or stopping, means snapping out the growing point at the top of the stem so the sprouts below fill faster and more evenly. The theory is sound. The New Hampshire trial explains that auxins made by the growing tip suppress the buds below it, so removing the tip lets those buds expand.
The evidence is more mixed. In the first season, topping once the lowest sprouts were about 1.3 cm to 2.5 cm across lifted marketable weight from roughly 220 g to 280 g per stalk, but only for varieties that were ready to top about eight weeks before harvest; late varieties topped 19 days out gained nothing. In the second season, plants topped 24 to 75 days before harvest gained yield, while early varieties topped 64 to 106 days out grew whole new stalks, made tiny sprouts on them and finished with less usable crop. The researchers concluded that topping more than about 60 to 85 days ahead of harvest was counterproductive, that 30 to 60 days out is the useful window, and that the benefit assumed a single once over harvest rather than weekly picking. In Western Australia, the farmnote reports that some growers top late crops when the first sprouts are picked, to size up the rest.
For a home garden, that adds up to a clear position. If you are picking from the bottom up over several weeks, you do not need to top, and topping early will cost you. If warm weather is closing in and the top half of the stem is still covered in pinheads, take the growing tip out once the lowest sprouts are at picking size, roughly four to six weeks before you want the last of them. The leafy top knot cooks like a small cabbage, so do not waste it.
Harvesting from the bottom up
The first sprouts appear at the base of the stem and work upward, so a sprout plant is a long, slow supply rather than one harvest. The farmnote has the crop ready about 14 weeks after transplanting and picked for two to three months after that.
Pick each sprout while it is firm, bright green and still tightly closed, about the size of a walnut, which matches the 30 mm to 45 mm the farmnote gives as good market size. Snap them off with a sharp downward tug or cut them with a knife, and take two or three leaves off above the level you have just picked, which exposes the next sprouts and helps them dry quickly after rain. Left too long, a sprout loosens, yellows and opens.
Frost is the reward for the wait. The RHS says the flavour is sweeter once sprouts have been frosted, and the farmnote notes that frost is believed to improve sprout quality. The mechanism is documented in a close relative: a 2026 study of 26 kale varieties in the Journal of Plant Physiology found mean leaf sucrose rose from about 64 mg/g dry weight to about 203 mg/g after four natural frosts between minus 1.1°C and minus 2.3°C, with the sugar acting as a protectant against freezing. Kale is not a sprout, so treat that as an explanation rather than a measurement of your dinner.
Caterpillars and cabbage aphid
Brassica caterpillars are the obvious threat, and they are covered in our guide to cabbage white and diamondback caterpillars. The short version for sprouts: get fine insect exclusion mesh over the plants before the butterflies arrive and keep it there. ABC Gardening Australia magazine suggests swapping the summer shadecloth for pest exclusion netting around March or April, when the weather cools but the butterflies are still about. Because the plants are tall, plan a frame that can carry mesh to about a metre.
Cabbage aphid (Brevicoryne brassicae) is the pest that catches sprout growers out. Cesar Australia describes dull grey green aphids up to 3 mm long, in colonies with a blue grey look under a thick whitish powder, most often on the undersides of leaves. On a sprout plant the colonies build on the youngest leaves, the growing tip and inside the forming sprouts, which are exactly the parts that turn into your crop. Populations peak in late winter and early spring and develop fastest when daily maximum temperatures reach 20°C to 25°C, which is the tail end of the Australian sprout season.
So look early and often. Check the growing tip and the undersides of the youngest leaves from mid season, squash colonies between finger and thumb while they are small, and let the ladybirds, hoverfly larvae, lacewings and parasitic wasps do the rest; our guide to aphids in the Australian garden covers the wider picture. Wide spacing and stripping the lower leaves keep air moving, which helps. At the sink, pull one sprout apart before cooking a bowlful, since aphids, wax and cast skins can end up tucked between the outer leaves.

Is one plant worth the space?
At 60 cm spacing, each plant occupies about 0.36 square metres for six to nine months, so it is fair to ask what comes back. The farmnote gives commercial yields of 1 kg to 3 kg per plant, with 50 to 80 sprouts weighing 20 g to 40 g each. Home garden figures are usually more modest, and variety matters enormously: in the New Hampshire trial the best untopped varieties returned roughly 575 g to 610 g and 54 to 59 sprouts per plant, while the weakest managed about 50 g and eight sprouts.
Judge it this way. If you garden in the cool and alpine zone, or the colder parts of the temperate and Mediterranean zones, and you can spare a sheltered bed for most of a year, sprouts are among the most rewarding things you can grow, and they stand in the garden through the months when little else does. If your winters are mild, the same ground will grow two crops of something else in the time one sprout plant takes.
If the timing suits you, one variety to look for is Long Island Improved, an old open pollinated variety that matures from the bottom of the stem upward. Bear in mind that the top yields in the New Hampshire trial came from F1 hybrids and its open pollinated entries were the most variable, so sow a few more than you need and keep the strongest, most uniform seedlings, because with this crop a vigorous start is most of the battle.
Common questions
Can I sow Brussels sprouts in autumn with my other brassicas?
In most of Australia, no. The crop needs six to nine months and has to be well grown before the cold arrives, so an autumn sowing ends up filling its sprouts in spring warmth. Sow in late spring or early summer, and plant out by about the end of December in temperate gardens.
Do I have to wait for a frost before picking?
No. Pick sprouts as they firm up and close, whatever your winter does. Frost is not required, it simply tends to improve flavour, and gardeners in frost free districts can still grow a good crop where the winter nights are cool enough. Loose or blown sprouts are still edible, just not worth storing.
Can I grow Brussels sprouts in a pot?
Yes, with a compact variety and a big container. The RHS suggests one plant per pot of at least 30 cm diameter and advises against planting more densely. A pot dries out faster than a bed, so watch the water, because a plant that dries out at any point pays for it later.